

User guide
BandAssist step by step
This guide takes you from the first launch through every feature. You don’t have to read it in one go: chapters 1 to 6 get you to your first soundcheck, and you can look up everything else when you need it.
Prefer paper or offline? Download the guide as a PDF
What BandAssist does
BandAssist is an app for bands with a digital mixing console. It brings together everything you need around rehearsals and gigs: mixer and guided soundcheck, monitor mixes for every band member, setlists and sheet music on the mic stand, sampler, effects and routing, light, custom control panels and multitrack recording.
The program runs on your computer and controls the console over the network; via USB it listens to what arrives on the channels. You use it there in its own app windows and from tablets and phones at the stage in the browser – each device with the view it needs right now.
Setlist, music stand, sampler, light, spectrum analyzer, tuner, timer and control panel also work without a console.
The basic principle: BandAssist suggests, you decide. You can preview every suggestion first and then apply it – or discard it. “Reset all” undoes every change BandAssist has made on the console.
Everything works offline. Only the two AI features and the online sample search need an internet connection.
Install, launch and quit
Install
- Windows 10/11: Run the installer and follow the wizard. If Windows reports “Windows protected your PC”, click More info › Run anyway.
- macOS: Open the DMG for your Mac (Apple Silicon for M1 and newer, otherwise Intel) and drag BandAssist into the Applications folder. On first launch, start it with right-click › Open, or click Open Anyway under System Settings › Privacy & Security.
- Linux (x64): Extract the archive and run
./install.shin the folder. BandAssist then appears in the application menu. Uninstall with./install.sh --uninstall.
The programs are not signed. That’s why your operating system shows a warning on first launch – this is normal.
Launch
After launch, BandAssist opens in its own app window – without an address bar, with its own icon in the Dock or taskbar. Mixer, monitor mix, setlist, music stand, spectrum analyzer, tuner, timer, recording, light and control panel each open their own window; a second click brings the existing one to the front. Tapping a channel name also opens a separate “Channel” window.
At the same time, a fader icon appears in the menu bar (macOS), the system tray (Windows) or the panel (Linux). The menu offers:
- BandAssist – brings the main window back
- the QR code and the network link (one click copies it) – when network access is allowed (chapter 27)
- Monitor mix, Setlist, Music stand, Spectrum analyzer, Tuner, Timer, Recording, Light and Control panel – open these windows directly; analyzer, tuner and timer work even without a console
- Quit – stops all automatic functions, turns off the oscillator and quits the program
Closing the main window only hides the windows: BandAssist keeps running in the background, and so do running recordings and automatic functions. To exit, use Quit in the menu, or ⌘Q on a Mac. When you log out or shut down, BandAssist finishes a running recording cleanly.
If the system’s web engine can’t be started (e.g. Windows without WebView2), the interface opens in your browser at http://127.0.0.1:8732, as before. If a Linux desktop has no system tray, a Quit button appears at the top of the interface instead.
Connect the console
Your computer and the console must be on the same network, for example on the same router or Wi-Fi.

- Automatically: BandAssist searches for consoles on the network at launch (also via the “Find console” button). One click on the console found connects. The search finds X32, X Air and WING.
- By IP: Choose the console type on the left, enter the IP address and click “Connect”. On the X32 and WING you find the IP under Setup › Network, on the X Air in X AIR Edit under Setup › Network. Soundcraft Ui can usually be reached on its own Wi-Fi at
10.10.1.1. BandAssist then detects Ui12/16/24 or the TF model by itself.
No console at hand yet? “Start demo” simulates the selected console type with a band, measurement mic, feedback and a snare with reversed polarity. That way you can try everything out safely. Demo mode has its own profiles and settings.
Under Demo sound you can choose one of three real songs from the “Mixing Secrets” Free Multitrack Download Library by Cambridge Music Technology instead of the synthetic signals. The first time, BandAssist downloads the excerpt directly from there (about 30 MB each) and puts the individual tracks on the demo channels. The recordings are intended for practice and educational purposes only and must not be redistributed.
At the top, next to the connection status, you disconnect again (“Disconnect” or “End demo”). This stops all running functions and takes you back to the start page. Values BandAssist has changed stay on the console – to undo them, use “Reset all” first.
What each console can do is described in chapter 31.
Set up audio
For sound, phase, feedback, room and loudness, BandAssist needs the audio signal of the channels. It comes from the console via USB.
- Connect your computer to the console via USB.
- On the console, route the channels to the USB outputs:
- X32/M32: X-USB card, Routing › Card Output, channels 1–32
- XR18/MR18: Routing › USB Send
- WING: Routing › USB
- Ui24R: channels 1–20 are on USB 11–30 in the default routing (BandAssist takes this into account by itself)
- In BandAssist, choose the audio device under Settings › Console & Audio, e.g. “X-USB”, “X18/XR18” or “WING”.
XR16, XR12, MR12, Ui16 and Ui12 have no USB audio. For the audio features you need a separate audio interface there.
Mac: If no signal arrives, permission is often missing. Allow access for BandAssist under System Settings › Privacy & Security › Microphone. BandAssist shows the reason in plain language below the spectrum and in the log.
Measurement mic
For room measurement and loudness you need a measurement mic (calibration or omni mic). Connect it to a free channel, ideally the last one (X32: 32, X Air: 16, WING: 40), and name the channel “Meas Mic” on the console. BandAssist then recognizes it automatically and excludes it from gain staging and automix. Don’t forget phantom power.
Spectrum without a cable
The spectrum in the channel view can also come from the console’s built-in analyzer (RTA) instead of USB – then it works on an iPad without a cable, too. Under Settings › Console & Audio you choose the source: “USB, otherwise the console’s RTA” (default), “Always the console’s RTA”, “USB only” or “Off”.
The interface

Header
- Title at the top left: opens the view menu – Mixer (this full view), Monitor mix, Setlist, Music stand, Spectrum, Tuner, Timer, Recording, Light and Control panel. The same menu is at the top left of every view. On the computer, each view opens its own window; on tablets and phones you switch within the same window.
- Connection status and Disconnect or End demo
- Recording (red circle): starts a recording; while one is running, the header shows the time in red (chapter 20)
- Monitor mix | Tuner: the split button slides the monitor mix (chapter 19) or the tuner (chapter 18) over the view
- Stop (■): stops all running automatic functions, turns off the oscillator and clears solo
- Reset all (↺, red): stops everything and restores every value BandAssist has changed
Channel strips
You adjust all knobs (gain, pan, EQ, compressor, reference pitch) by dragging up/right or down/left, or with the mouse wheel or arrow keys. For pan, balance, EQ gain and reference pitch, a double-click – a double-tap on iPhone and iPad – resets the knob; a single tap changes nothing.
On the far left is the Main LR fader with MUTE. It stays in place when you scroll the channels sideways. Each channel strip shows level, fader, pan, M (mute) and S (solo), gain (G) and fader (F) in dB, the channel’s role and below that “select” or “✓ selected”. Small status icons show where 48 V, EQ, compressor, delay or polarity are active.
- Select a channel: tap the channel strip. Most functions work with the selected channels. Quick selection below: “Channels with signal”, “All”, “None”.
- Channel view: tapping the channel name opens all the details of the channel (chapter 15).
- More channel strips: After the input channels come – color-coded by type – aux inputs, FX returns, buses, matrices and DCAs with level, fader, mute, solo and pan (DCAs without level and pan). What is available depends on the console.
- Layers: The vertical buttons on the left in front of the master switch between layers – each is its own view of the channel strips with its own selection and order, such as “Drums”, “Vocals” or “Monitors”. Under “Arrange channels” you name and color the active layer; “+ Layer” creates a new one.
- Arrange channels (top right) shows all channel strips of the active layer, hidden ones faded: at the bottom of each strip “Visible/Hidden”, drag the name field to move it. “Named channels only” hides unused ones like Ch 17, “Reset order” restores the console’s order. Hidden channels are not selected by “All” or “Channels with signal” either.
- Role: Kick, Snare, Vocals, Bass … BandAssist recognizes it by the name. The role determines how the channel is analyzed and what priority it has in automix. You can change it in the channel strip at any time.
- Stereo pairs: Channels linked on the console (e.g. Keys L/R) appear as one channel strip and are handled together everywhere.
On the right below the channel strips are the console’s mute groups as numbered buttons. Channels muted by a group are dimmed.
Below them are the tabs with the soundcheck functions: Soundcheck, Gain staging, Sound, Phase, Feedback, Room, Automix, Loudness and AI assistant. The Settings are a separate view in the view menu (chapter 29).
Preview and apply suggestions
Sound analysis, phase check, room measurement and AI deliver suggestions. Every suggestion has a split button Preview | Apply:
- Preview sets the values on the console temporarily. The button lights up blue, and “Preview active · end” appears at the top. Tapping again restores the previous state.
- Apply keeps the values.
- Apply all is available per channel and for all channels – also with preview.
- Reset suggestions discards results you don’t need.
Don’t confuse the two: 🎧 Listen in the channel view doesn’t set anything on the console, it plays the channel in the browser (chapter 15).
Play it safe: “Reset all” (↺ top right) restores every value BandAssist has changed. Use gain staging and the feedback hunter only during soundcheck, never during the show.
Guided soundcheck
In the Soundcheck tab, BandAssist calls up the selected channels one by one. Per channel: solo, voice announcement to the band (“Kick, please play”), wait until someone plays, gain staging, sound analysis. For mic pairs such as kick in/out, the phase is checked at the same time.
- Select the channels at the top, e.g. with “Channels with signal”.
- Choose what should happen: Voice announcement, Solo the channel, Analyze sound and phase.
- Start soundcheck. Skip channel moves on to the next one, End soundcheck stops.
- Afterwards, all suggestions are collected in the tab – apply them individually, per channel or all at once. With ↺ you reset a channel’s summary together with its suggestions.
You set where the voice announcement comes out under Settings › Voice announcement (chapter 29).
Gain staging
All selected musicians play at the same time, as loud as in the loudest song. BandAssist measures the peaks and sets the gain to the target value in several passes. Clipping is caught immediately.

- Target peak level (dBFS): how high the peaks should be. The orange line in the level meter shows the value.
- Measuring time per pass and Passes: measuring longer and more often is more accurate.
Under Settings › Console & Audio you set what gets adjusted: Preamp gain (recommended) assumes that channel 1 is fed by input 1. With a stage box on AES50, choose the matching entry; with custom routing, Digital trim is the better choice.
Sound analysis and AI assessment
In the Sound tab, BandAssist records the selected channels, looks for resonances, mud, harsh areas and overlaps with the vocals, and suggests suitable compressor values based on the dynamics. Nothing is changed automatically.

- Select channels and let the musicians play.
- Set the recording time and click Start analysis.
- Check the suggestions, preview them and apply them.
The suggestions cover low cut, up to four EQ bands (bell or high shelf), compressor including knee, gain and – for mic pairs – polarity and delay. EQ suggestions use unused bands first; if an occupied band has to give way, the suggestion says so (“replaces band 3 …”).
AI assessment
With Get AI assessment, after an analysis BandAssist sends Claude each channel’s name, role, gain, fader, level, the measured spectrum and the rule-based suggestions. Back come an assessment of each channel, an overall impression and complete settings. Claude only sees measurements and doesn’t hear the sound. Rule-based and AI suggestions use the same EQ bands – it’s best to apply only one variant per channel. Setup in chapter 26.
Phase and polarity
The Phase tab compares two mics on the same source, for example kick in and kick out. It finds mics with reversed polarity and time offsets that make the sound thin, and suggests a polarity flip or delay.

- Select exactly two channels at the top. A stereo pair such as the overheads counts as two – if you select only that, left and right are compared.
- Let the source play (for drum pairs, that means the drummer) and click Check phase.
- Preview the suggestion and apply it.
Overheads are only checked for polarity, since a delay would shift the stereo image there. In the channel view this also works for a single channel: “Check phase with …” and choose the second channel.
Feedback
The Feedback hunter listens to a mic or an output and detects frequencies that start to ring. In automatic mode, they are cut narrowly in the EQ of the selected output and the cut is deepened if needed.
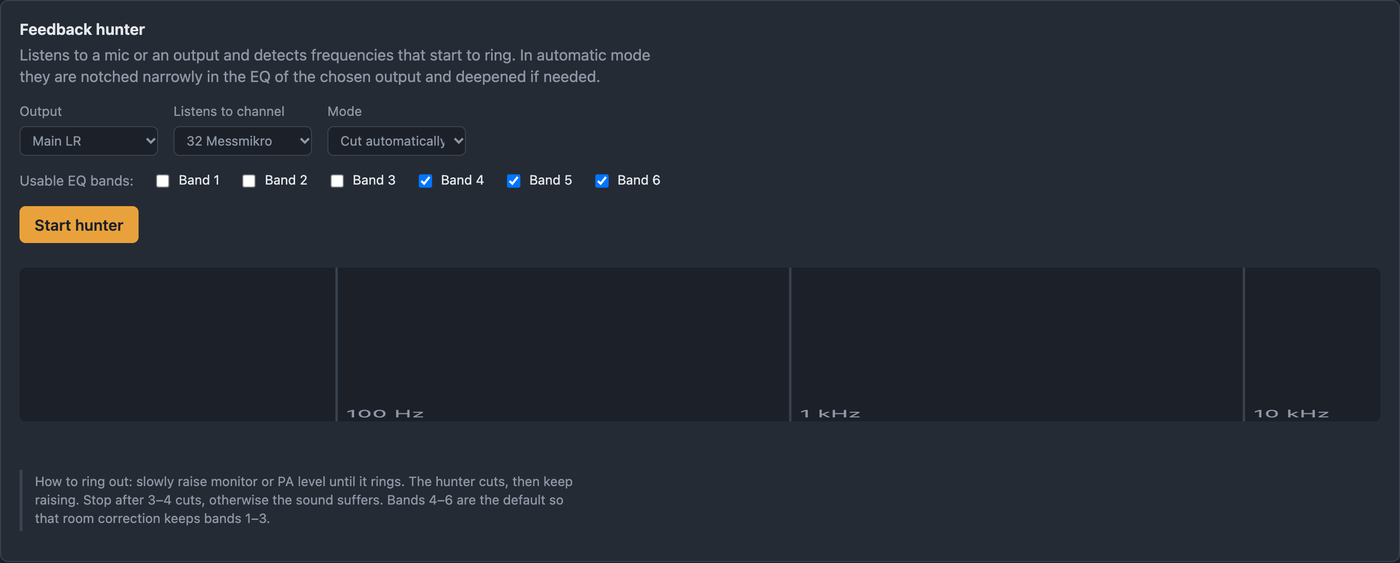
- Output: Main LR, a monitor bus or a matrix
- Listens to channel: the mic that is ringing, or the measurement mic
- Mode: “Cut automatically” or “Display only”
- Usable EQ bands: the default is bands 4–6, so that room correction keeps bands 1–3
How to ring out: Slowly raise the monitor or PA level until it rings. The hunter cuts, then keep raising. Stop after 3–4 cuts, otherwise the sound suffers.
Measure the room
A measurement mic stands in the audience, pink noise plays through the PA. BandAssist compares what reaches the mic with a target curve and suggests corrections for the main EQ (bands 1–3).

- Choose the measurement mic’s channel and the Target curve (“Live (slight bass lift)” or “Linear”).
- Set a low Noise level and click Noise on.
- Place the mic and click Measure this position. Repeat at several positions – averaged, this gives a more reliable picture.
- Preview the correction and apply it. Start over discards the measurements.
The noise uses the console’s oscillator. On the console, check under Utility › Oscillator that its destination is Main LR. X Air, WING and Soundcraft have no remote-controllable oscillator – there you play in the noise yourself. On the Soundcraft Ui, BandAssist sets the nearest band of the 31-band graphic EQ.
Automix
Automix rides the faders of the selected channels so they stay stable relative to each other. Vocals take priority, overheads step back. Faders only move within the set range around their starting position.

- Range (± dB): how far a fader may move away from its starting position
- Speed (dB per second): how quickly it follows
Set up a good basic mix by hand beforehand. A channel’s role determines its priority; the measurement mic is ignored.
Monitor loudness
The Loudness tab measures the sound level at the measurement mic in dB(A): the current value, the average over the chosen time window (Leq) and the maximum. The value stays visible in the header.

- Set the measurement mic’s channel, the Leq limit and the Time window.
- Start monitoring. If the limit is exceeded, BandAssist warns you.
Calibrate
Without calibration, the values are only relative. Hold a sound level meter next to the measurement mic, play noise or music, enter the displayed value and click Calibrate. After that, don’t change the measurement mic’s gain any more. Ask the organizer about the usual guideline values (e.g. DIN 15905-5: 99 dB(A) over 30 minutes).
Channel view and master view
Tapping the channel name opens the Channel view – on the computer in a separate “Channel” window (another channel switches within it, ✕ or Esc closes it), on tablets and phones above the mixer. Here you see and set everything for a channel or stereo pair.

- Level and fader vertical like on the channel strip, next to them the level values and the fader value for typing in
- Gain and pan as knobs: drag up or right to turn up, Shift for fine steps, the mouse wheel and arrow keys work too; double-clicking pan centers it
- 48V for phantom power (with a confirmation prompt) and Ø for polarity – per side for stereo pairs
- Mute and solo, below them the mute groups as numbered buttons: red means the channel belongs to the group. One tap changes the assignment on the console.
- 🎧 Listen – see below
- Spectrum: green is live, dashed orange is the last analysis, blue is the channel’s EQ curve; with the “with EQ” switch, dotted white additionally shows the live spectrum with EQ. Switch between USB, RTA and Off.
- EQ: Drag the bands directly in the curve (horizontal for frequency, vertical for gain, mouse wheel for the Q) or set them with the knobs in the band’s color. Drag the low cut via its “LC” point. EQ and low cut each have an on/off switch.
- Compressor: The transfer curve shows input level against output level. You can drag threshold, ratio and make-up directly in the curve; the knee range is shaded violet. Below it, the knobs in pairs: threshold/knee, ratio/make-up, attack/release. The white point moves live with the level; next to it you see the estimated gain reduction and its history.
- Delay with an on/off switch and the acoustic path shown in meters
- Sends to all monitor mixes: level, on/off, pan for stereo mixes, plus the tap point (input, pre/post EQ, pre-/post-fader, subgroup) – the same values as in the monitor mix
- Actions: Gain staging, Analyze sound, AI assessment and “Check phase with …” for this channel only – with its suggestions below
Listening to a channel in the browser
With 🎧 Listen, the channel (or the stereo pair) comes into the browser via USB audio – for example with headphones on a tablet in the middle of the room. That way you hear a single channel without pressing solo on the console.
- raw plays the signal as it arrives via USB.
- processed emulates low cut, EQ and compressor as they are set on the console. This is an approximation – gate and effects are missing.
- The slider below sets the volume.
The signal arrives with a delay of about 0.2–0.5 seconds. On an iPhone, turn off the silent switch, otherwise you won’t hear anything. Listening requires USB audio from the console.
All changes go to the console immediately and can be undone with “Reset all”. ◀ ▶ or the arrow keys take you to the next channel, Esc closes.
Master view
Tapping “Main LR” above the master fader opens the Master view: level L/R, fader, mute, the master EQ (draggable in the curve), compressor and the master spectrum. The master spectrum always comes from the console’s RTA.
Spectrum analyzer
The analyzer is a separate window with a large spectrum – ideal for a second screen. You open it via the view menu at the top left or via the menu bar – even without a console. You can have several windows with different sources open at the same time.

- Source: any input of any audio device (with channel names for the console’s USB), any audio output of your computer (captured) or the console’s RTA for every channel and Main LR – on the X32 also buses, matrices and mono. Stereo pairs can also be selected: side by side, stacked or combined in one area.
- This device: the microphone of the phone, tablet or laptop on which the view is open – see below.
- Display: RTA bars (1/3 or 1/6 octave), line (1/12 or 1/24 octave) or spectrogram
- Averaging: fast (125 ms) or slow (1 s); Weighting: Z, A or C; Peak-Hold
- Orientation: frequency at the bottom (vertical) or on the left (horizontal)
- At the bottom: level (peak and RMS), maximum with “Reset” and the history of the last minute
On macOS 14.2 and later, BandAssist captures your computer’s outputs – the first time, macOS asks for permission to record system audio. On Windows this works via WASAPI loopback, on Linux via the monitor sources of PulseAudio/PipeWire.
Microphone of phones and tablets
In the source menu of the spectrum, tuner and channel view there is This device: the microphone of the device on which the view is open is continuously sent to BandAssist and analyzed there – on the other devices it appears as “On the network: iPhone” etc. This lets you measure from the middle of the room, for example.
Browsers only allow microphone access over an encrypted connection. For this, BandAssist additionally offers https://<IP>:8733 with its own certificate when network access is turned on. Set up microphone … guides you through the installation once per device: iPhone and iPad via a profile (then turn it on under Settings › General › About › Certificate Trust Settings), Android, Mac and Windows via a certificate file. Via the tunnel it works without setup.
Timetable and timer
Under Settings › Timetable you set up the evening’s schedule. The timer window then shows in large digits how long the current slot has left.

- + Time slot adds a slot: enter the start time, title and duration, and BandAssist calculates the end.
- + Break adds a break of the set length (default 20 min). + Break after inserts it after a slot and moves all later slots back.
- Shift all moves all start times earlier or later at once.
- Timer blinks from sets the remaining time at which the display starts blinking (default 30 s).
Changes are saved immediately. The times apply every day; slots past midnight work too.

You open the timer window with “Open timer window”, via the view menu or the menu bar – even without a console. It shows the remaining time of the current slot as a 7-segment display, its title above it, the next slot at the bottom left and the clock at the bottom right.
- Green, yellow in the last 5 minutes, red in the last minute, breaks in blue; shortly before the end the display blinks
- Before and between slots, it counts down to the next start
- Without a timetable, it shows the time in large digits with weekday and date
- Double-click switches to full screen
Tuner
You open the tuner via the view menu, the Tuner button at the top right, the menu bar, or in the channel view with the Tuner button next to the spectrum – then the channel is already selected as the source and the instrument matches the role. It also works without a console.

- Source: as with the spectrum analyzer – every console input via USB, every audio device, every output of your computer and the microphone of your phone or tablet. Stereo pairs are mixed together.
- Instrument: Chromatic, guitar (standard, Drop D, ½ step down, DADGAD), 4- and 5-string bass, ukulele, violin, viola, cello and banjo (Open G).
- Note: “Auto” detects the nearest string or the nearest semitone; a button fixes the note.
- Reference pitch: knob at the bottom left of the display, default A = 440 Hz; a double-click or double-tap resets it.
- MUTE at the bottom right of the display silences the channel on the console while you tune – if the source is a console channel.
- Auto mute below it mutes the channel automatically as soon as the tuner is open, and unmutes it on closing – but only if Auto mute muted it.
Like a measuring instrument, the pointer shows ±50 cents: green up to ±3 cents (after half a second a ✓ locks in), yellow up to ±10, otherwise red. Below it runs a strobe: it rolls to the left when the note is too low, to the right when it is too high – the faster, the further off – and stands still when it is in tune. Below that you see the note, the deviation in cents and the frequency.
Monitor mix for the band
In the monitor mix, every band member sets their own monitor or in-ear mix – ideally on their own phone or tablet. To open it: view menu, Monitor mix button at the top right, menu bar, or on a tablet via the link with ?view=monitor (chapter 27).


- The first time, choose your own Mix – the buses appear with their names from the console. The device remembers the choice.
- Use the faders to make the channels in your own mix louder or quieter. On the left is the overall volume of the mix with mute.
- MUTE takes a channel out of this mix only; the channel itself stays on. SOLO lets you hear a channel in your own mix only; afterwards everything is back as it was.
- After the channels come the console’s aux inputs and FX returns (e.g. playback, click, reverb) – with send, mute, solo and pan like the channels.
- Tap at the top next to “My mix” switches all channels of the mix at once, e.g. to pre-fader so the monitor doesn’t follow the front-of-house fader (X32 and X Air).
- Arrange channels hides and shows channels and reorders them by drag & drop on the name field – saved per mix on this device. On an iPad in portrait, many channels are spread across several rows.
Stereo for in-ears: If two buses are linked on the console (X32/X Air: bus link), they appear as one mix, e.g. “Mix 7/8 · IEM L/R”. Then there is a pan knob per channel and a balance for the whole mix; the Pan knobs button hides and shows them.
Like everything else, the monitor mix can be undone with “Reset all”. With WING, Soundcraft Ui and Yamaha, the integration hasn’t been tested on every console yet.
Recording
BandAssist records all channels straight from the console’s USB audio – as a multitrack recording for Logic, Reaper, Cubase, Studio One and co.
- Tap the round record icon at the top right.
- Enter a name and choose which channels are recorded: all, all without hidden ones, or only the selected ones. The dialog shows the free storage and how long it will last.
- Start. The header shows the running time in red – on the tablet, too. Stop recording stops it.

Each channel gets one mono WAV file (24-bit, the console’s sample rate, unchanged), named after channel number and name. All files are exactly the same length down to the sample and sit in a folder “date time name”. In Logic, drag them into the arrangement together and choose “Create new tracks” – each channel then sits on its own track.
Track view
The Track view (button in the recording dialog or menu bar) shows each track with channel number, name, role color, level and a waveform that follows along while recording; clipped passages are red. At the top you choose the time range (“Overall”, “10 min”, “1 min”) and earlier recordings, which you can view the same way and remove with Delete. Only what BandAssist created is deleted.
Storage
Per hour and channel you need about 520 MB at 48 kHz. Files are saved to ~/Music/BandAssist; you can change the folder under Settings › Console & Audio › Recording, but only on the computer itself. The files stay readable even after a crash. When the disk is almost full or a WAV file reaches its 4 GB limit (about 8 hours), BandAssist stops the recording cleanly. Disconnecting, changing devices and quitting finish a running recording; the stop button does not.
Repertoire, setlist and music stand
BandAssist manages the band’s songs and the setlists for your gigs. On stage, the “Setlist” and “Music stand” views show the active song – on all devices at once.
Repertoire
In the “Setlist” view, the Repertoire button opens the list of all songs. That’s where you add them: title, artist, key, starting note, who starts, count-in yes/no, time signature, tempo (also by tapping), a different delay tempo if needed, and notes. For each song you can attach a PDF with lyrics, chords or sheet music.
Setlists
- In the “Setlist” view, create a setlist with the Setlists button: name, venue and date of the event.
- Choose the songs from the repertoire.
- Distribute them randomly across a given number of sets or sort them in by drag & drop – also between sets. Enter the start and end for each set, plus encores.
- Export PDF creates a one-page setlist for printing.
At the bottom you set where the metronome clicks: device, channels and volume – for example an output that only goes to the in-ears.
“Setlist” view

You open the “Setlist” view via the view menu, the menu bar or with ?view=setlist. At the top you choose the setlist; below, all songs are shown as large buttons, grouped by set. One tap makes a song the active one.
- Metronome turns the click on and off. It accents beat one; dots show the beat.
- You adjust the tempo with − / + or Tap. BandAssist then asks whether the song should keep the new tempo.
- Edit setlist reorders the songs by drag & drop, also across sets. The pencil on a song opens “Edit song”; + Song below a set adds a song from the repertoire or creates a new one.
- Song | Link: If an Apple Music track is linked to the song, “Song” plays it on the Mac running BandAssist via the Music app (title, progress, pause, stop and volume at the bottom); the link button opens it on the device in your hand.
- Rehearsal mode: The selection at the top contains “Rehearsal – all songs (A–Z)”. The music stand, “Up next” and page turning then follow the alphabet. Songs with “Active” turned off are left out of rehearsal and of the selection lists for new setlists.
Music stand

The music stand (menu bar or ?view=stand) is made for the iPad on the mic stand. It always shows the active song with all its details and the next song in the set, with the PDF below. When someone changes the song in the setlist, the music stand follows immediately.
Sheet music per role: At the top, each device picks its role, such as electric guitar or piano. For each song you can store several PDFs, separate ones per role; the music stand shows the PDFs for that role one after another like a single document, otherwise those of the “Default” role – plus the role’s starting note.
- Turning pages: ‹ › at the bottom center, swipe horizontally or use the arrow keys. Past the last page you go to the next song in the setlist, before the first one back to the previous song. The Songs switch turns this off; under Settings › Music stand it can be locked for all music stands. Zoom with two fingers, pan with one; double-tap resets.
- Crop trims empty margins, Dark shows light text on a dark background – colored chords stay colored.
- Notes: With the Apple Pencil you write directly on the sheet music at any time, with your finger after tapping ✎ Notes. The toolbar offers colors, stroke width, eraser, undo and “Clear page”; the split button switches between pen and highlighter, which marks passages wide and translucent. The notes appear on all devices.
- Edit song: The pencil next to title and artist opens the same dialog as in the repertoire. There, Transpose chords − / + shifts the chords in the PDF by semitones – key and starting note move along, “Original” resets.
- Collapse: The button next to the pencil hides the header, details and bottom bar. A narrow bar then shows title, next song, starts, count-in, key and starting note – so almost the whole screen is left for the music.
- Foot pedal: Bluetooth pedals like AirTurn turn pages without any setup. With the pedal button you assign them yourself: page forward/back, song forward/back and monitor mix on/off.
- Monitor mix and tuner in between: The buttons at the top – in “Setlist” and “Music stand” – slide the monitor mix or the tuner over the view. Page, zoom and mix stay as they were.
When a song is activated
When a song becomes active – in the setlist, on the music stand, via pedal or on another device – BandAssist can set up everything else right away. You configure this under “Edit song”:
- MIDI on activation: as many commands as you like to keyboards, effects units and MainStage, e.g. a patch in MainStage and a preset on the Line 6 Helix at once. You set up the devices once under MIDI devices … (name, output, channel, type); “Send now” tries it out.
- Console on activation: scenes and snippets stored on the X32/M32, snapshots on the X Air – first the scene, then the snippets. “Load now” tries it out.
- Delay tempo: Under Settings › Console & Audio › “Delay tempo” (X32/M32), the time of the delay effect follows the song’s tempo, with a selectable note value.
- Apple Music: search for the matching track or paste a link; “Preview” plays an excerpt.
- Light: a fixed mood (calm, lively, driving) and custom color palettes (chapter 22).
- Sampler on activation: the sampler bank that becomes active with the song (chapter 24).
Light
BandAssist controls the lighting rig via Art-Net – through an Art-Net node on the network that passes the DMX signal to the fixtures. You open the Light view via the view menu, the menu bar or with ?view=light.

Setup
- Under Setup, turn on Art-Net and enter the IP of the Art-Net node (empty = broadcast).
- Add fixtures: search for the device in the library – around 650 devices from the Open Fixture Library, plus generic profiles such as dimmer, RGB, RGBW, moving head and fog machine. Then choose mode, universe, start address (the next free one is suggested), Quantity and Role: front light, wash, back light, moving head, effect light, mirror ball, blinder, strobe or fog.
- Arrange the devices on the Stage by drag & drop the way they hang – the audience is at the bottom.
- Combine devices into Groups, e.g. “Wash left” and “Wash right”. Each group gets its own fader.
The DMX patch shows each universe as a grid: each device occupies its channels in color and can be dragged to another start address; channels used twice turn red. If a device is missing from the library, Create custom device … adds it with the channel list from the manual. For moving heads you set the pan/tilt limits; “Locate” (press and hold) makes a fixture light up white. Individual devices can be deactivated.
Live
The stage preview shows what is being sent right now – even without hardware. For moving heads you see the color and direction of the light beam. Below it are the Overall fader, one fader per group as in the mixer, Blinder and Strobe (while held) and Blackout.
Automation
The light automation listens to the music – by default via the console’s channel meters and the channel roles, or alternatively via any source of the spectrum analyzer. It detects music, announcements and silence, tempo, beats and energy:
- Harmonious color palettes: mostly single-colored when calm, more complementary when loud. Change switches to a different palette immediately.
- Moods depending on energy: calm with soft crossfades, loud with chases and pulses on the beat. Changes happen at phrase boundaries; the arrangement and groups on the stage play their part.
- Moving heads move in a different pattern for each mood – mirrored, parallel, as a wave, in a circle or as a fan – moving smoothly within their limits.
- During announcements and breaks, everything except the front light fades out.
- Calm | Lively | Driving sets the energy for 10 seconds – good for sudden changes. You can tap along the tempo with Tap; Auto detects it on its own again.
Per song, a fixed mood and custom color palettes can be stored under “Edit song” › “Light”. The fog has its own button (while held) and a timer (every … minutes for … seconds, optionally only during music).
Control panel and external controllers
The Control panel is a surface of your own that you put together yourself – for example for the iPad on stage. You open it via the view menu, the menu bar or with ?view=panel.

Putting together a control panel
- Tap Edit. The grid (columns × rows) is adjustable.
- Add elements, move them on the grid and resize them at the bottom-right corner.
- Tap an element to choose label, icon, function and color. Buttons, faders and knobs can have several actions at once.
- End “Edit” – the control panel is the same on all devices.
- Text: current title, next song, key, BPM, setlist, time, channel name or custom text
- Button and Push button (only while held): next/previous song, metronome, mute, solo, strobe, fog, blinder, blackout, light automation, color palette, tap light tempo, Apple Music
- Fader and Knob: volume of a channel or of Main LR, monitor volume, panorama, overall light or a light group, fog output
- Displays: levels, BPM LEDs in the tempo of the song or the light, states such as “Recording” or “Console connected”
- Groups are frames with a title and color that take their elements along when moved.
A separate layout can be created for portrait and landscape; iPhone and iPad switch when rotated. With the selection next to the title you create several control panels and switch between them.
External controllers
Under External controllers at the top of the control panel, you assign the same actions to MIDI controllers on the computer running BandAssist:
- AKAI APC mini mk2, APC mini, APC40 mk2 and MIDImix
- Novation Launchpad Mini mk3, Launchpad X and Launch Control XL
- Korg nanoKONTROL2, Behringer X-Touch Mini and X-Touch Compact
- Elgato Stream Deck via USB (also Mini, XL, +, Neo and Pedal) – each key shows a label, icon or a value such as level, tempo or the next title. The Elgato app must not be running at the same time.
- Custom MIDI device: turn on “Learn” and press buttons or move faders on the device – each control appears in the grid and is assigned like on the other devices.
“Active” turns a device on, “Setup” shows a replica of its surface. Tapping a control chooses action and LED: the buttons light up according to the state, e.g. red for mute or in time with the song.
Sampler
The sampler plays intros, applause, break music or sound effects at the push of a button. You open it via the view menu, the menu bar or with ?view=sampler.

Playback happens on the computer running BandAssist – through an audio device and its channels, which you choose under “Edit”, for example the USB interface into the console. Tablets, phones, control panel and controllers only trigger; so the sound always reaches the console.
Setting up banks and pads
- Tap Edit. At the top are the banks as tabs – rename, add, delete and choose the grid (2–8 columns × 1–8 rows).
- Tap a pad and pick a sample under Choose …: from your own library, via a search on Freesound or Openverse, or as a new file (WAV, AIFF, FLAC, OGG, MP3, on a Mac also M4A/AAC). Whole folders and ZIP packs can be imported.
- Set name, color and behavior:
- Playback: complete (once) or only while held
- Pressing again: restart, stop or layer another on top
- Repeat endlessly or n times, volume, fade in and out, start and end point
- Group: one pad stops the others in its group – like open and closed hi-hat
- Button on the keyboard
- “▶ Preview” checks the pad, leave “Edit” – done.
Play
One tap starts a pad; each pad shows progress, remaining time and pass. Several pads can sound at once. Stop all (or Esc) fades everything out; at the top you set the overall volume.
- A bank per song: Under “Edit song” › “Sampler on activation” you choose the bank that becomes active with the song (chapter 21).
- Control panel and controllers: “Play sample” (lit while it plays), “Stop all samples” and “Current bank · pad n” – so a Stream Deck key always plays the right pad for the active song.
Freesound: To search Freesound you need a free API key from freesound.org, which you enter under Settings › Sampler. Openverse works without a key. License, author and source stay with the sample and are shown in the pad dialog.
Effects and routing
Effects and routing are currently available for X32 and M32. You open both views via the view menu, the menu bar or with ?view=fx or ?view=routing. All changes go to the console instantly and can be undone with “Reset all”.
Effects

The view is laid out like a 19" rack: the console’s eight effect slots sit in it as modules, colored by effect type.
- A display per slot picks the effect: FX 1–4 all algorithms (reverb, delay, chorus, flanger, phaser, combinations, EQs, dynamics, amp simulation, pitch), FX 5–8 the insert effects.
- Below it all the parameters: knobs with units, switches, segment buttons, graphic EQs as a row of 31 faders, dual effects as blocks A and B.
- For FX 1–4 also the source (insert or mix bus as effect send) and the return level with mute.
- At the very top the patch bay with sends, FX inputs and insert points. Cables show what goes where. With Re-patch you drag a cable from jack to jack.
Routing

Routing shows in tabs where the signals come from and where they go. You can only make changes once you turn on Edit at the top – so nothing gets re-patched by accident.
- Overview: toggle “Live – inputs” / “Playback – from the computer” and two quick actions: Recording via USB (the card gets the same inputs as the channels) and Virtual soundcheck (the channels hear the recording from the computer; “Live” switches back).
- Inputs: blocks of eight for live and playback, aux in.
- Channels: the source of each channel as a patch bay – drag a cable from the source to the channel, re-patch at the plugs, drag into empty space to disconnect. Or as a list, if you prefer.
- Outputs: XLR, aux, Ultranet, AES and recording outputs, also as a patch bay. Below each output is its tap point; tapping it explains the options and changes it.
- Card & AES50 and Inserts: what goes to the USB card and stage boxes, and which effect is inserted where.
AI assistant
In the AI assistant tab you describe what you want to hear, for example “vocals sound too thin” or “more keys on monitor 2”. Claude suggests concrete changes on the console, which are carried out only after you confirm.

Setup
- Create an API key in the Claude Console (console.anthropic.com).
- Enter it under Settings › AI and save. The key is stored only locally on your computer.
- Optionally, enter a different model.
For this, Claude receives the channel list with names, roles, faders and levels. Audio is never sent. Each request costs a small amount, billed to your Anthropic account. Without internet, the AI assistant and AI assessment are simply disabled.
Control from a tablet or phone
- Under Settings › Network, check “Allow other devices on the same network”. A PIN is created, which you can change (4–8 digits).
- Scan the QR code with your tablet or phone – or type in one of the links. The link with the computer name stays the same even if the IP changes; some Android devices don’t know such names, so use the IP link there.
- Enter the PIN on the device. The field only shows dots and opens the number pad on phones.
The login stays valid for 12 hours – even if BandAssist restarts in the meantime. If you change the PIN, all devices have to log in again. In the settings, the eye button next to the PIN shows it, so you can pass it on to the band.

Views on tablets and phones
Every view runs on tablets and phones: the Mixer with all channel strips, monitor mix, setlist, music stand, spectrum, tuner, timer, recording, light and control panel. The title at the top left opens the view menu; you switch within the same window.


As an app on the home screen
On iPhone and iPad, you add the mixer, the monitor mix, the setlist, the music stand, the spectrum analyzer, the tuner, the timer, the recording, the light and the control panel individually via “Share › Add to Home Screen” – each with its own icon and name, even before the PIN login. They then open full screen like an app. Within such an app, you switch between the views via the title at the top left.
After five wrong PIN attempts, sign-in is locked for one minute. API key, network settings and quitting only work directly on the computer. The connection is unencrypted HTTP – fine on your own network, use with caution on other Wi-Fi networks. When you first turn it on, the firewall may ask whether to allow incoming connections.
Profiles
Under Settings › Profiles you save the current state under a name, e.g. “Band XY – City Hall”. A profile contains channel roles, loudness calibration and limit, room EQ, input routing and which channels are shown.
When you load a profile, the room EQ appears under Room as a suggestion and is not applied automatically – in a different hall, better measure again. Channel roles you change by hand are kept across restarts even without a profile.
Settings
The settings are a separate view: at the very bottom of the view menu, also in the menu bar or system tray, or with ?view=settings. On the left or at the top you choose the section.
Console & Audio
Here you choose the audio device, what gets adjusted during gain staging (preamp gain or digital trim), the spectrum source in the channel view, the folder for the Recording (chapter 20) and, in demo mode, the Demo sound (chapter 3). “Read values from console again” re-reads names, gain, faders, mutes, links and mute groups, e.g. after a scene was loaded on the console.
Which channels appear and in which order is set directly on the channel strips with Arrange channels (chapter 5).
Voice announcement
Voice announcements use your system’s speech output. You can add as many outputs as you like (device and channels); the announcement plays on all of them at the same time. Without an entry, it comes from the system output. “Test announcement” checks this.
Announcements only in the in-ears: Your computer’s USB outputs arrive at the console as USB or card inputs. For example, route card 1–2 to a channel for the PA and card 3–4 to a channel that only goes to the in-ear buses. On Linux, install espeak-ng for this.
Music stand
“Allow song changes on the music stand” sets whether you can turn past the last page to the next song on the music stand – for all music stands. If it is off, the “Songs” button is grayed out.
Sampler
Here you enter the API key for the Freesound search (only on the computer itself, chapter 24).
Reactions
When BandAssist detects music – or that it stops – it can change channel strips automatically, for example the FX returns of reverb and delay to 0 dB during songs and to −∞ for announcements. For each reaction you choose the channel strip (FX returns as a stereo pair too, buses, DCAs, matrices, aux), fader with crossfade time or mute, and the value with and without music. Detection works like the light automation (chapter 22); triggered reactions are shown in the log.
Timetable
The evening’s schedule for the timer window (chapter 17).
Language
BandAssist is available in German, English, Spanish, Portuguese (Brazil), French and Italian. Switch under Settings › Language or via the globe at the top right of the start page and the PIN entry. The choice applies per device; if you don’t choose one, BandAssist follows your browser’s language, otherwise English. Voice announcements and AI respond in the language of the device that starts them.
Shortcuts and direct links
- Channel view: ← / → previous or next channel, Esc closes
- Channel strips: Tab jumps to the next element, Space or Enter selects a channel, ↑ / ↓ adjusts faders and controls (Page ↑ / Page ↓ in large steps)
- Direct links to append to the address:
#sc#gain#eq#phase#fb#room#mix#loud#aiopen a tab,#kanal-11the channel view of channel 11,#summethe master view,?view=monitor,?view=setlist,?view=stand,?view=analyzer,?view=tuner,?view=timer,?view=recorder,?view=light,?view=sampler,?view=fx,?view=routing,?view=paneland?view=settingsthe respective view (?view=settings&sub=ttstraight to the timetable)
Log
Shows what the program has done recently – newest message at the top. Helpful when something isn’t working.
All settings are stored in ~/.bandassist/config.json (Windows: %USERPROFILE%\.bandassist\config.json), readable only by your user account.
Safety and good practice
- Stop stops all running automatic functions, turns off the oscillator and clears solo.
- Reset all restores every value the program has changed.
- Use gain staging and the feedback hunter only during soundcheck, never during the show.
- Start the oscillator at a low level.
- Only switch on 48 V if the mic needs phantom power – be careful with ribbon mics.
- Test without an audience before your first real gig – for example in demo mode.
Console specifics
BandAssist knows what each console can do over the network. Anything that can’t be controlled remotely is hidden or shown as “set by hand”.
| Console | Specifics |
|---|---|
| X32 (all models), Midas M32 | Full feature set |
| X Air XR18, Midas MR18 | 16 channels, 6 buses, 4 mute groups, no matrices. No digital trim, no per-channel delay (the phase check only suggests polarity), no remote-controllable oscillator. |
| X Air XR16/XR12, Midas MR12 | Like the XR18, with 4 or 2 buses. No USB audio: audio features only with a separate interface. |
| WING, WING Compact, WING Rack | 40 channels, 16 buses, 8 matrices, 8 mute groups. Mute group members can’t be read, no stereo links like on the X32, no RTA over the network, no oscillator. |
| Soundcraft Ui24R | 24 channels, 10 aux, 6 mute groups. Master and aux with 31-band graphic EQ: room EQ and feedback hunter set the nearest third-octave band. No oscillator. |
| Soundcraft Ui16/Ui12 | 12 or 8 channels. No USB audio: audio features only with a separate interface. |
| Yamaha DM3 | Fader, mute, pan, sends, preamp gain, solo, mute groups and levels over the network. EQ, low cut, compressor and polarity as “set by hand”. Feedback hunter only on mix buses and matrices. |
| Yamaha TF | Like the DM3, but gain and solo can’t be controlled remotely either: gain staging, EQ, compressor and feedback hunter by hand only. Analysis, suggestions, automix, analyzer, loudness and monitor mix work. |
Support for Soundcraft Ui and Yamaha is based on the manufacturers’ documentation and has not yet been tested with real hardware on every model.
If something doesn’t work
- The console isn’t found.
- Your computer and the console must be on the same network. The search doesn’t find Soundcraft and Yamaha – choose the console type and enter the IP instead. A firewall can block the search.
- No audio arrives.
- Check the audio device under Settings › Console & Audio and check the USB routing on the console (chapter 4). On a Mac, give BandAssist microphone permission. The reason is shown below the spectrum and in the log.
- The RTA curve doesn’t move.
- Under Settings › Console & Audio › “Set RTA source via”, try the next option. Below the spectrum you can see what the console reports as its RTA source.
- The tablet can’t find the link.
- Use the IP link instead of the name link, check network access and the firewall, and put the tablet and computer on the same Wi-Fi.
- The loudness values seem wrong.
- Without calibration they are only relative. Calibrate, and don’t change the measurement mic’s gain afterwards.
- Something changed unintentionally.
- “Reset all” (↺ top right) restores every value BandAssist has changed.